Creating a Loan
Last updated: May 12, 2026
This guide will walk you through the high-level steps of creating a loan in Hypercore. For more in-depth knowledge, refer to our other guides.
Step 1: Accessing the Loan Creation Page
You can create a new loan from various locations within Hypercore:
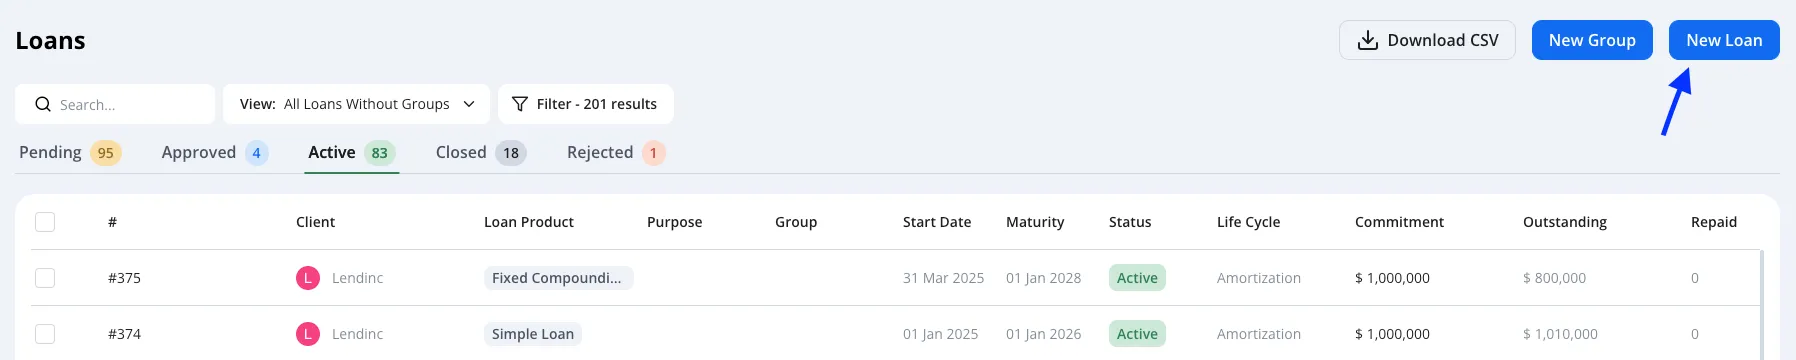
Loan Portfolio Page: The most common way to create a new loan.
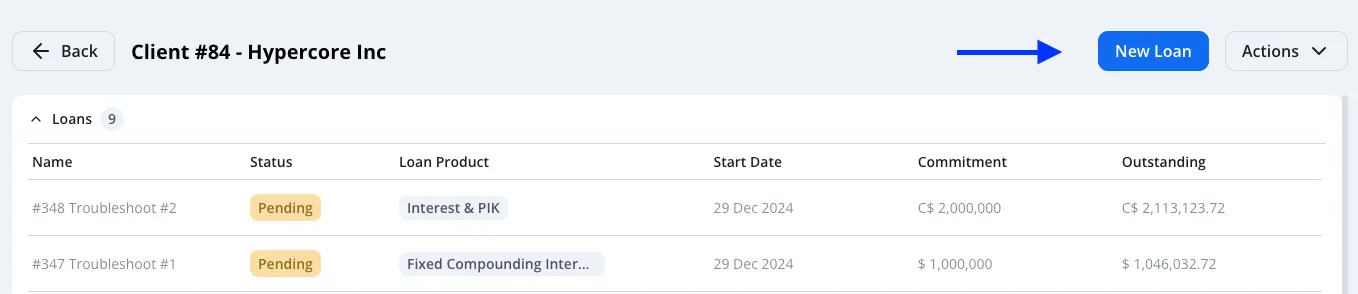
Client Page: Add a loan directly to a specific client.
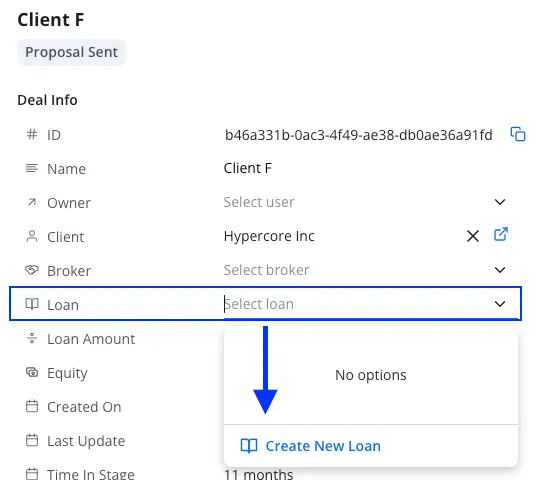
Workflows: Create loans as part of a workflow - already connected to a specific client.
Imports: A different process entirely. For more details, contact your Customer Success Manager. A future guide on this process will be added later.
Step 2: Inputting Basic Loan Details

Choose the Loan Type from the available options
Loan Types are temSUGGESTED ADDITION (March 23 transcript): Submission Date vs. Disbursement Date - The submission date auto-fills to today and cannot be set after the intended disbursement date. If the disbursement is months away, plan accordingly - set the submission date on or before the disbursement date.plates pre-configured to match the needed fields to your various loan products.
For any changes or additions to the loan types, feel free to reach out to your Customer Success Manager.
Fill out the Loan Name and Submission Date
The submission date will automatically be used as the first disbursement date unless changed manually (see utilization assumptions below)
Other optional fields:
Purpose - This field is used for segmenting your loans (whether from the portfolio, reports, statements), however does not affect the loan in any way
Maturity Date - The end date as specified in the legal agreement. Used as validation on certain triggering events, however does not affect the loan schedule directly.
Contract Closing Date - The date in which the legal agreement was signed. Does not affect the loan schedule.
Step 3: Configuring Principal Terms
Choose the Approved Loan Amount (Commitment)
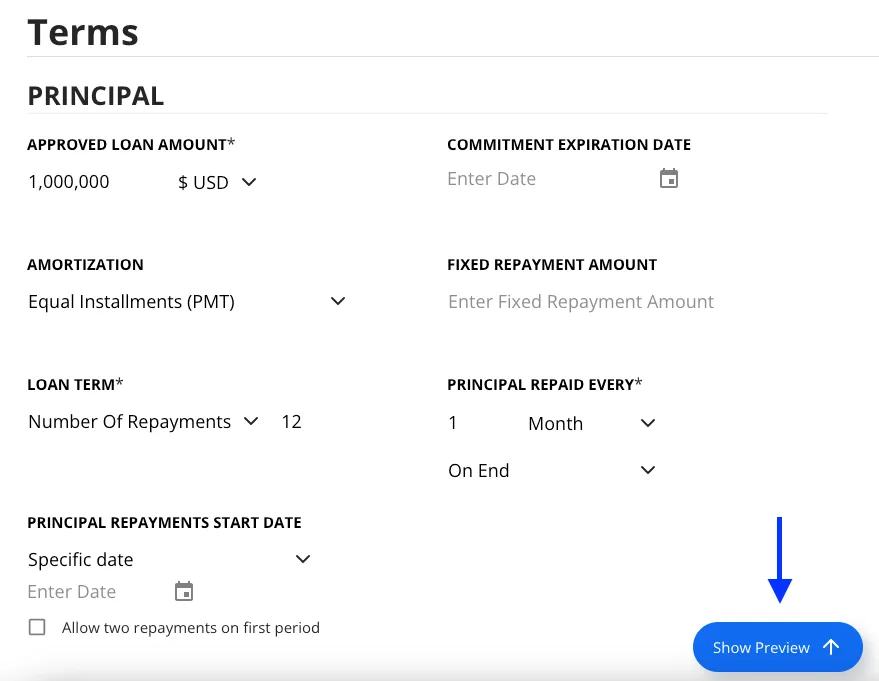
Select the Amortization Method (Equal Installments, Equal Principal, Custom). *See below for a quick guide on Custom amortization.
Set the Loan Term by either # of repayments or End Date
Set up the Principal Repayment Frequency
If the first repayment is not in-line with the frequency, you can manually set via the Principal Repayments Start Date
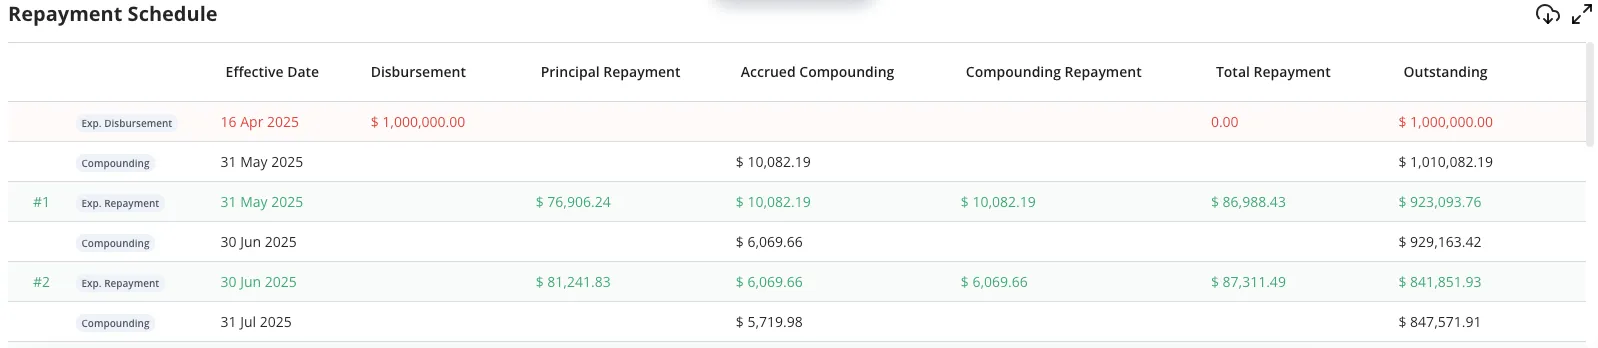
Review the Repayment Schedule Preview to ensure accuracy.
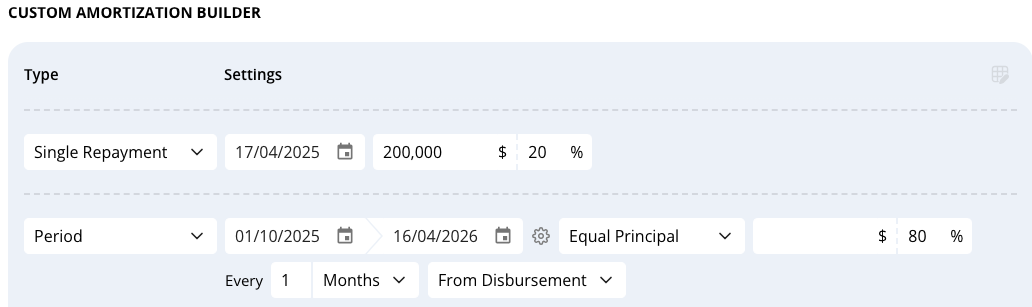
Custom Amortization
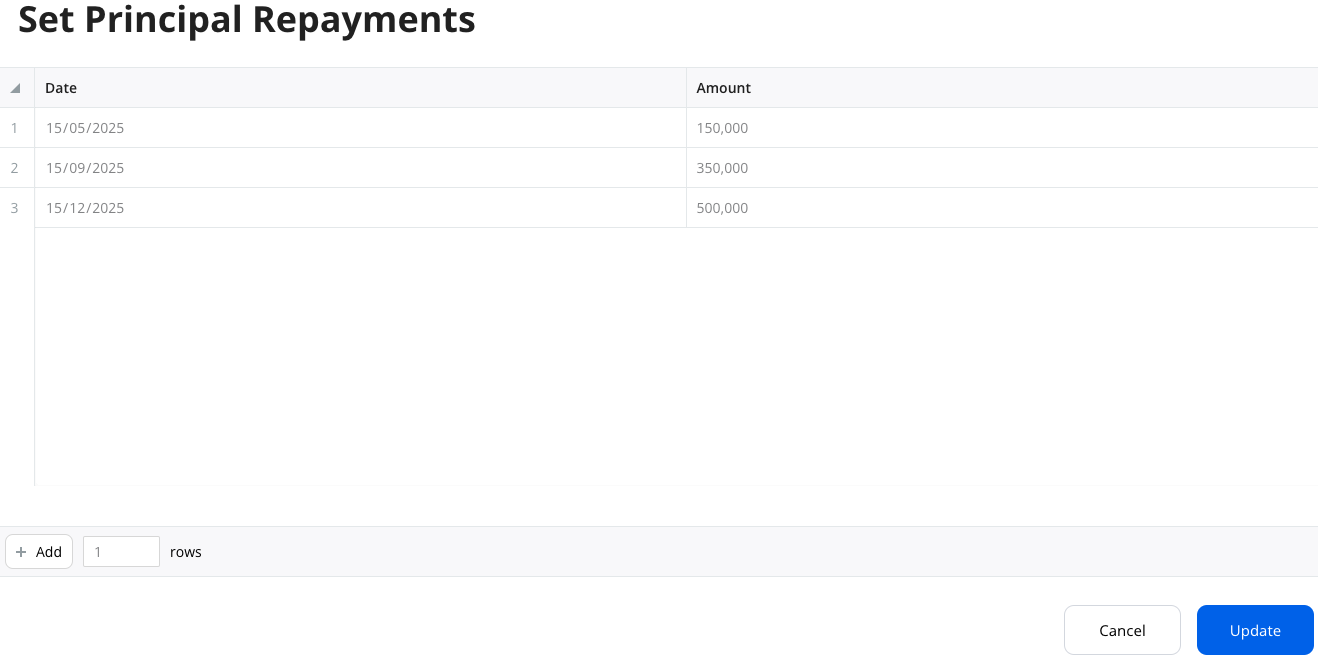
Custom amortization allows you to enter the principal repayments in a variety of methods:
By single repayment: date + amount
Periodic repayment: frequency + amount
By set repayments: date + amount
Step 4: Configuring Interest and Compounding Terms
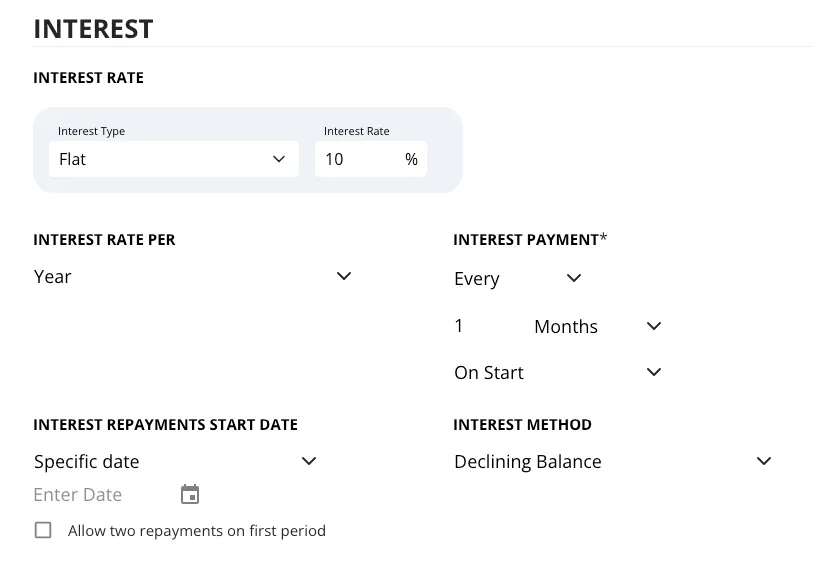
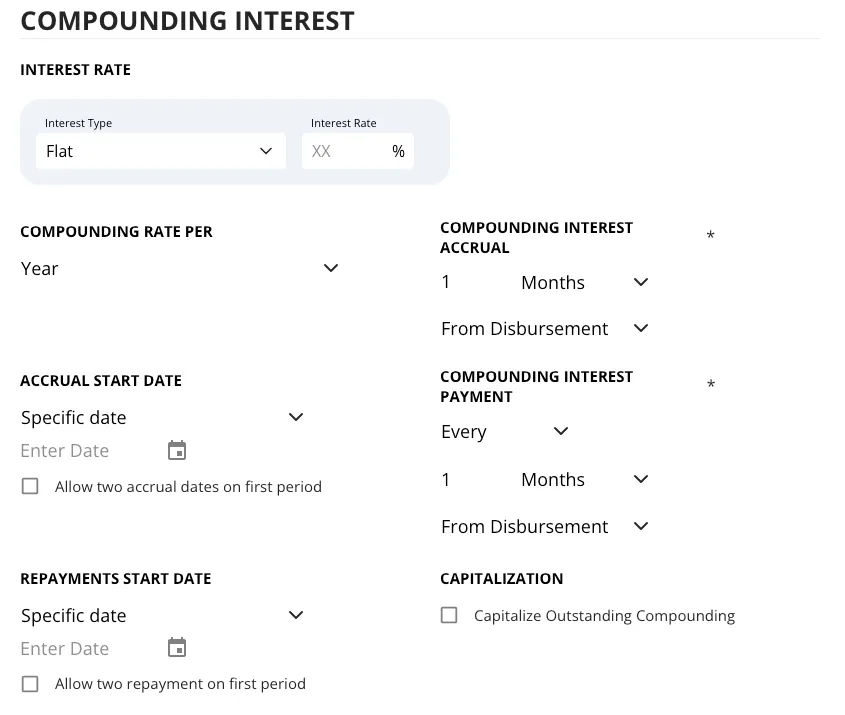
When configuring interest in Hypercore, you'll define how interest accrues, the repayment frequency, and whether it compounds over time.
Interest Type: Simple vs Compounding (PIK)
In Hypercore simple interest (cash interest) and compounding interest (PIK/capitalized) are separate components both on the loan terms creation and on the loan schedule.
Compound interest accrues on itself after every accrual period and is capitalized into the outstanding balance.
If you have a loan with both compounding and simple interest, you can decide if the simple interest should be calculated based on the principal or principal+accrued compounding.
Interest Rate: Fixed vs Floating
Fixed Interest: A static rate
Floating Interest: Consists of a base reference rate (like SOFR) plus a margin. You can also configure:
A Minimum and Maximum cap on the total interest rate
A Rate Determination Frequency that defines how often the floating rate updates (e.g., monthly, quarterly)
Interest Accrual Frequency
This determines how often interest is accrued (e.g., Monthly, Quarterly). It defines the cadence of interest buildup.
Interest Repayment Frequency
Determines the frequency of interest repayment
Each expected repayment will include the accrued interest on the respective period
Any unpaid compounding interest will accrue on itself
Here are the differences between Simple and Compounding Interest accrual/repayment frequencies
Cash Interest
Repayment Frequency only
This defines how often interest is paid by the borrower (e.g., monthly, quarterly).
Interest does not accrue to the loan balance—it's simply paid on a schedule.
Compounding Interest
Has both an Accrual Frequency and a Repayment Frequency
Accrual Frequency determines how often unpaid interest is added to the loan balance (i.e. compounded).
Repayment Frequency defines how often payments are expected.
If no payments are made, interest continues to accrue and compound based on the set accrual schedule.
Step 5: Utilization Assumptions
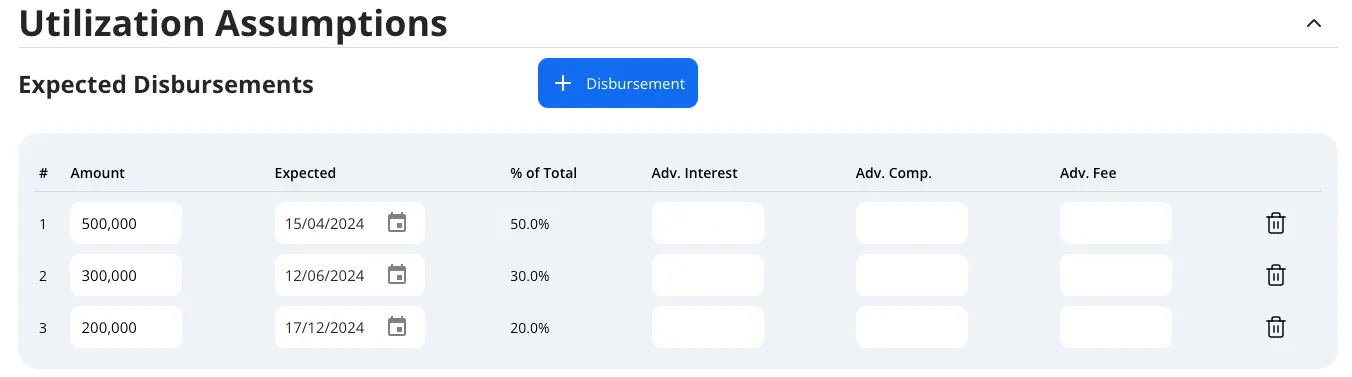
Utilization Assumptions is Hypercore's way of setting up your Expected Disbursements.
To set up expected disbursements you will need to provide an amount and date.
When adding expected disbursements, the % of approved amount will automatically be calculated.
Step 6: Adding Fees
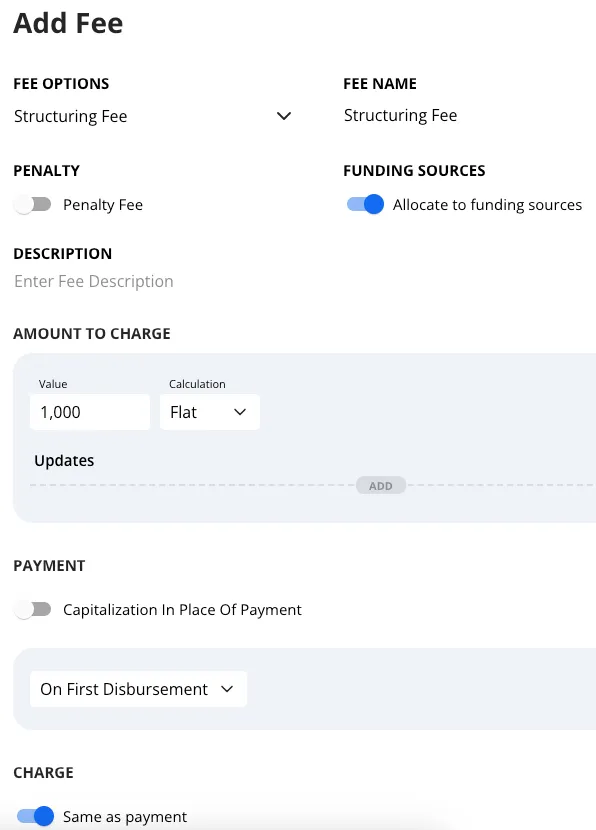
Select a Fee Option
Fee options are pre-defined templates that auto-fill all relevant settings for a fee. You can contact your Hypercore Customer Success Manager to configure these.
After selecting an option, you can freely edit any detail, or choose not to use a template and build the fee from scratch.
Fee Name
Auto-filled when using a Fee Option, but you can edit it at any time.
Penalty Fee Toggle
Enabling this classifies the fee as a penalty. This does not affect its calculation but will change how it's displayed (e.g., separate columns on the schedule and summary) and its priority in adhoc repayments based on your configured repayment strategy.
Define Amount to Charge
Payment Settings
Capitalization In Place of Payment: When enabled, the fee will be added to the loan's balance rather than paid immediately. This amount will accrue interest like any other part of the balance.
Payment Timing: Select when the fee should be paid. Options include:
On a specified date/s
On a frequency (e.g., monthly, quarterly)
On a triggering event (e.g., disbursement, repayment, early redemption)
Charge Timing
Same as Payment Toggle: Fees will be paid when they are charged (added to the schedule). Disabling this allows you to select the charge timing of the fee to be different than that of the repayment.
Example: A fee may be charged at default but paid only upon loan resolution.
Note: Fees can also be compounded using a dedicated toggle that opens additional settings like accrual frequency.
Step 7: Adding Deposits
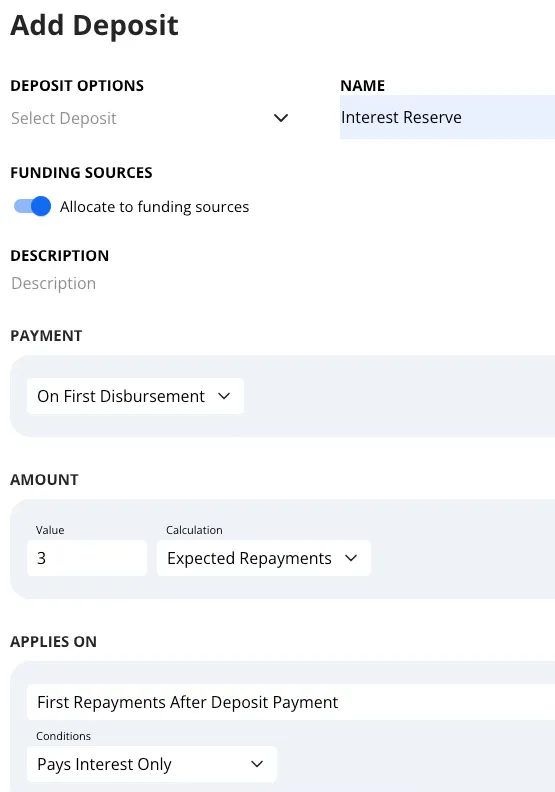
Deposits in Hypercore are a form of reserve within the loan. The borrower pays a predefined amount upfront, which is later used to cover future repayments. Here's how to configure a deposit:
Select a Deposit Option (Optional)
Deposit options are pre-set templates that auto-fill common settings. Contact your Hypercore Customer Success Manager to configure these for your loan types.
You can select an option to pre-fill values or create the deposit manually from scratch.
Set the Payment Timing
Choose when the deposit should be paid. Common options include:
On a Specified Date
On Loan Start
On First Disbursement
Define the Deposit Amount
You can define the amount as:
A Flat Amount
A Percentage such as Commitment, Outstanding, Disbursement, etc.
X Number of Expected Repayments – one of the most common configurations. Hypercore will calculate the repayment amount (e.g., interest only) at the time of disbursement and multiply it accordingly. For example, 3 expected repayments of $10k in monthly interest = a $30k deposit.
Set the Application Timing
Determine when the deposit will be used to repay the loan. Options include:
First Repayments After Deposit Payment – repays the first installments immediately following the deposit
Last Repayments – the deposit is held and used at the end of the schedule
Apply Conditions (Optional)
Define how the deposit will be applied by setting repayment conditions:
None – applied across all repayment components
Exclude Fees – deposit will not cover fee amounts
Interest Only – deposit will be applied only to interest components
Example: A deposit is set to be paid on the first disbursement and is equal to 3 expected repayments. If the interest accrued is $10k/month and the condition is 'interest only', the borrower will pay $30k up front. Hypercore will then automatically use this to repay the first three monthly interest payments.
Click Add Deposit to apply the configuration.
Step 8: General Settings
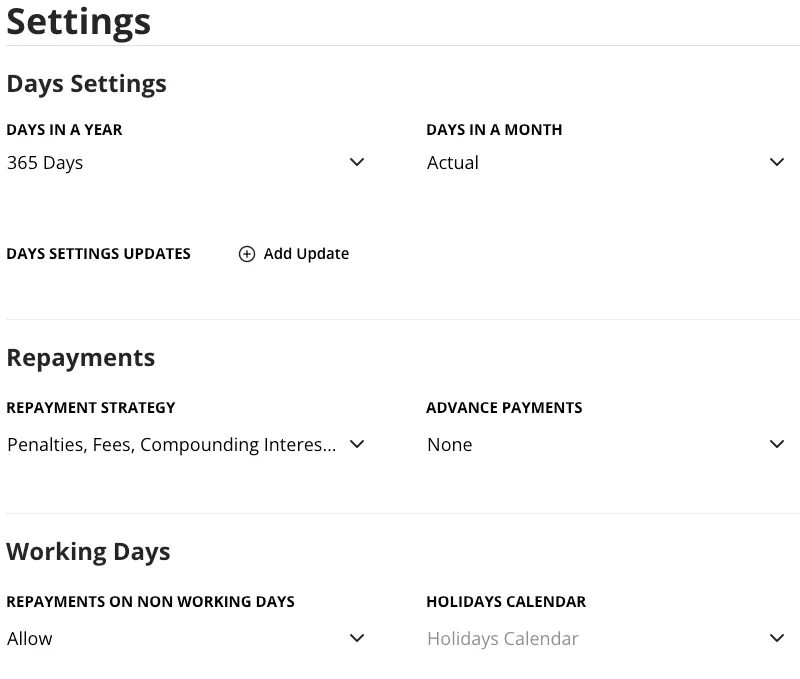
The General Settings section defines core assumptions used throughout the loan, including day count conventions, repayment rules, and working day logic.
Days Settings
Days in a Year / Days in a Month
These control how daily interest and other charges such as fees/penalties are calculated.
You can configure them independently, allowing for combinations like 360/30, 365/Actual, etc., depending on your loan agreement.
Days Settings Updates
Use the Add Update button to change the day count settings mid-loan.
This is useful for amendments or contract changes. Updates will recalculate future interest based on the new settings.
Repayments
Repayment Strategy
This defines how incoming repayments are allocated when no detailed breakdown is provided.
For example, if a borrower pays $100k without specifying whether it's for interest or fees, Hypercore will apply the repayment based on your strategy's priority (e.g., penalties > fees > interest > principal).
This is especially useful for ad hoc or partial repayments.
Advance Payments
This setting controls whether repayments (especially interest) are made in advance rather than in arrears.
Each repayment will include two dates:
Date: When the payment is made
Effective Date: When it impacts the loan schedule
For example if a loan pays interest in advance every month you can have a repayment on April 1 that is effective for May 1 (i.e. on April 1 the borrower will repay interest that is accrued between April 1 and May 1).
Available options:
None – All repayments are in arrears
Cash and Compounding Interest – All interest is paid in advance
Cash Interest Only – Only simple interest is paid in advance
Interest and Principal – Full scheduled amounts are paid in advance (excluding fees/penalties)
Working Days
Repayments on Non-Working Days
Determines how Hypercore handles repayments scheduled for non-working days:
Allow – The repayment can fall on a non-working day
Move to Previous Working Day
Move to Next Working Day
Holidays Calendar
If configured, this defines specific dates considered as non-working (e.g., national holidays).
These dates will be factored into repayment scheduling alongside the working day settings.
Working Days
You can customize which days of the week are considered working days.
Any unchecked day (e.g., Sunday or Friday) will be skipped when generating repayment schedules, unless "Allow on non-working days" is selected.
Step 9: Finalizing the Loan Setup
It is highly recommended to preview the loan schedule
Make any necessary adjustments to the loan details if needed.
Click Submit and Continue to finalize the loan creation.
Once submitted the loan will be created and in the Pending status
Important: A loan is only created once the application is submitted.
If the page is exited before submission - whether by clicking outside the application, closing the tab, or due to server/internet issues - all progress will be lost.
Tip: To avoid losing work, consider quickly outlining the key fields and submitting the loan. You can always return later to edit and complete the details.
Troubleshooting Tips
If you encounter errors when saving, check that all required fields are filled out and formatted correctly.
For support, contact Hypercore Support through the Help Center or via email.
Link to our📄 Loan Troubleshooting Guide